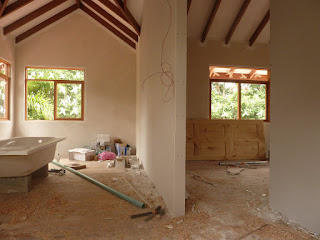
We are really happy with how the downstairs bathroom turned out. It is a half bathroom - just a toilet and a hand washbasin. It is under the stairs and we were never really sure that it would be possible to fit a bathroom under the stairs. Happily this was one aspect of the design that the architect was confident about and we're pleased we followed his advice.
Half Bathroom Design
Of course, it's still small - about 1.1m wide and 1.5m long. Unbelievably this turned out to be big enough even to have the door open to the inside so that it wouldn't obstruct the downstairs living space.
We had the same problem with the wash basin here as we did in the main bathroom - how to mount it.
Washbasin Mounting
The constructor convinced us that he had a solution. And it turned out ok, although this little countertop looks a little contrived or artificial. The reason for the strange shape is that we had bought a faucet that needed to be mounted in a way that gave us access to the tap, to be able to turn it.
Anyways, it turned out fine.
And most importantly when I stand up after doing my business I don't bang my head on the underside of the staircase.
Learn about building a house in Costa Rica from Jon and Caro's project in the southern region with pictures of the process and a description of each step.
29 Sept 2011
Upstairs bathroom fittings
The question with the bathroom is which of the fittings to do using poored concrete or block and which to do using furniture made from other materials, most obviously wood.
The constructor took most of the decisions about which fittings to build using concrete (his responsibility) and which to leave (someone else's problem). I tried to influence him but with only limited success and in general I think he made sensible choices.
By the way the bathroom floor is made from stone tiles bought locally and treated with a sealent to make them less porous. As with the clay tiles downstairs I think they could have used an extra coat of the sealant.
Bathtub
It seems like a really good idea to build the supporting structure for the bath using concrete - it is really sturdy. The only downside (if it can be called that) is that there is no way to get at the plumbing under the bath. Maybe some kind of access panel could have been designed in. I'm not sure how important it is.
Washbasin
It was harder to know what the best design for the wash basin was. The basin we had bought was designed to sit within a hole created specifically for the purpose. This hole could have been made in either a wooden or concrete countertop.
If it had been up to the constructor / contractor I think we would have ended up with a wooden countertop. But we didn't like the idea because wood, when it gets wet tends to go mouldy if it doesn't get dried immediately and where we are nothing dries ever so concrete makes more sense.
In the photo you can see the way the basin sinks below the level of the countertop. For $100 we got a carpenter to make a small piece of furniture to fit underneath with a shelf and doors to hide the pipework.
28 Sept 2011
Interior walls upstairs
Finished wall upstairs, made from plasterboard with a metal (aluminum?) structure. I think at one stage the builder would have liked these walls to be concrete block like the downstairs walls. I am no sure why I think that or why he would prefer it.
Perhaps they would be stronger and provide better sound insulation. Concrete is better (although not easier) to drill into than plasterboard / gypsum (or is it gipsum? Or gyprock? I'm still not sure what the difference is, if any) as long as you don't mind using wall plugs.
The builder started by the clay tiles on the outside terrace. The terrace is a few centimeters (5-10)below the level of the inside spaces, which acts as a way to indicate the difference between inside and outside (i.e. take off your shoes please) but also means water is less likely to ever get inside if it rains really heavily (which it can).
It could be important to take into consideration the thickness of the floor finish you are planning to use fairly early on in the design process so that you can achieve any desired effects. For example, we could not use a particular clay tile we liked on the stairs because it was too thick.
24 Sept 2011
Painted house and floor tiles
The floor tiles have arrived. We looked around a few places for clay tiles and were going to buy them ourselves but decided in the end that it was better that the constructor buy them - he could then make sure they arrived when he needed them and probably get a better price too.
Second time lucky with kitchen sink
Much happier with the size, shape and layout of this kitchen sink and draining boards. Although we've still ended up with a bit of funny space in the corner. But is there any kitchen anywhere in the world that doesn't have a funny space in at least one corner? I don't believe there is no matter what you tell me.
The big debate was whether to have two draining boards or two sinks. I think two draining boards has worked out quite well because we end up with less standing water on the kitchen surfaces. Probably Caro would disagree.
Sheet metal, insulation and ceiling
Not the greatest photos these but time ran out a long time ago to worry about this; sheet metal on top of insulation on top of plasterboard type stuff.
Labels:
constructor,
gutters,
insulation,
roof
27 May 2011
Finished arches plus pastered walls
From the outside the house practically looks livable in now :-).
Suddenly the trees and forest look really close. This will be nice on hot summer days because they will help to keep the house and terrace cool. On other days I think we will wish that more light would reach the windows. One option is to prune some branches or chop some tops off. We will see. We don't need to decide right now.
Our main concern these days is what colour to paint the exterior walls. Carolina prefers white and it seems that 99% of this planet's speaking population agree with her. I would paint it the colour of my shirt. Since this changes every day (or sometimes every two days) I guess it's not that practical.
What colour would you choose? You have 48 hours to reply.
Completed roof, begin arches
With the roof largely completed the stress is off as far as worrying about rain slowing things down - if it rains then people can work on stuff that needs doing inside like flattening floors, plastering walls, kitchen bits and bobs.
I think this photo must have been taken at the end of a day's work, or maybe at the beginning. Either way it's impressive how tidy everything looks! More evidence that the constructor in charge of the project cares about what he's doing, which is really encouraging.
Everything has started to slow down a little bit, and yet lots of things are still happening. In the photo below left you can see the form / mold for the front archway. At the bottom the windows on the front wall of the house are being moved a few inches to the left so that from the inside they appear centered.
I always find it hard to know how much to worry about small details. It has never been so clear to me that I will have to live with mistakes for the rest of my life!
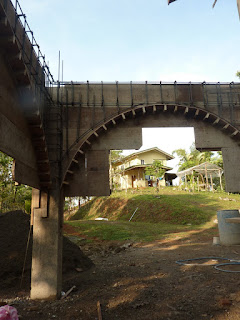
Having said that, we are really happy with the way the arches are taking shape. There was a lot of discussion about whether I would hit my head as I walked through and would have to duck (or grouse?) but thankfully (as I predicted with carefully worked out trigonometric calculations) there is more than enough space for me and my big head.
25 May 2011
Mateo, car, house
Preparing the walls for plastering
First they kind of splattered the concrete block walls with some kind of cement mix. Next, Luis (in photo) climbed up on this dodgy looking scaffolding and put another thin layer of cement mortar type stuff all round the house. I think the idea is that the plaster has something rough to stick to.
Btw, the thing Luis is kneeling on looks like a pretty good design for a workbench, doesn't it?
Roofing materials - ceiling
This material (Fibrolit) is for the ceiling of the bedrooms - the lower layer of the roof. It is cement based, semi-waterproof and fairly expensive. There are alternatives for ceiling materials - wood is common - but these may be less waterproof and liable to discolor if the humidity / rain gets to it.
5 Apr 2011
Carolina, roof beams, dogs
The completed roof beam support structure from the front of the house with dog and Carolina distractions.
The wood beams are still different lengths - they will cut these to the right length as they begin the next stages of the roof construction.
Sunny roof beams
Finished roof structure, for the back of the house, in which you may be able to spot the four slopes, if your eyes can make sense of all the pieces of wood pointing in different directions.
The wood being used is the same as that used for the floor beams - Chricano.
Inital Roof Work
First tentative steps toward roof structure begin slowly. The completed roof will have four slopes ("cuatro caidas" in Spanish) - at the front, back and sides. The slightly wonky shape of the house means that the support structure for the cuatro caidas is a little tricky to assemble - the wooden beams need to measured and cut precisely before setting in place.
2 Apr 2011
Day 35: Concrete beam around upper floor
At the beginning of week 6 the house now has a steel reinforced beam around most of the upstairs. And the sun is still shining most days. Hopefully they can get the roof on before the rain comes too heavy and too frequent.
View from window; Light
This is the view from the smaller of the two upstairs bedrooms, which we plan to put our son Mateo in on day. The windows are pretty big and east facing so I hope he doesn't get woken up by the morning sun. We will have to make sure he's got decent curtains. Or I like some blinds made from bamboo we've seen...
30 Mar 2011
Family on Stairs
The whole of our small family at the top of the completed staircase looking back towards Alex & Oren's house.
Concrete Staircase Form
Here come the stairs! We chose concrete for durability - wood looks nice but the constructor preferred to work with concrete. They are nice and wide, which is good - about 1.2m. This gives plenty of space for moving most furniture.
29 Mar 2011
Possible mold for window box
28 Mar 2011
Building site accomodation
The first thing the constructor built on site was temporary accomodation for workers who would be staying there and only travelling home on occasional weekends. The structure also has an area for eating and washing dishes, a shower and a space for preparing materials.
William Miranda Constructor + Electrics
This is the man in charge, el constructor, who is also doing all the electrics and plumbing for the house. His name is William Miranda, he lives in San Isidro in the district of Perez Zeledon and we are really impressed with his work.
In the photo you can also see that the horizontal beam has now been poored. You are looking at the kitchen window.
William has built houses and condos all over the sourthern region but especially on the coast between Dominical and Uvita and also near Platanillo on the road between San Isidro and Dominical. We saw many of the houses he built near Platanillo and were really impressed with how great they looked, even after several years of tropical weather.
I have no idea of whether he is expensive or not. I think the price he charged us was very fair. What is interesting is that though we started with a very strict budget and very worried about how much every detail would cost, after meeting William I began to appreciate more that we need to be a little more flexible on budget to make sure we end up with a house we really like.
The water container in the foreground is how William brings water to the site for the workers to drink because it is healthier than unfiltered river water they are using for the construction and he doesn't want the workers missing days because they're sick.
Form for arch column
27 Mar 2011
Chiricano Floor Beams
These floor beams are made from a wood that is known locally (and maybe in all the Spanish speaking world for all I know) as Chiricano. It is neither the most expensive wood nor the cheapest. It looks nice enough, is fairly hard, if the bugs / termites get at it they can make a few holes without causing much of a problem, and it's hard to work with. But that's ok because all that needs to be done is to cut it to the right lengths.
Concrete columns plus forms
The first floor columns of concrete are now in place and the wood you can see is the beginning of forms above the windows to enable a horizontal concrete beam to be poored, which in Spanish they call a "viga corona".
This is the front of the house in the photo; the entrance is round to the right hand side via the terrace. It doesn't have any fancy details or big statements - it's almost minimalist perhaps, if it has any style at all!
25 Mar 2011
Trench for water and electricity
This trench, alongside the access track to the site is where the water pipe and electricity cable will be lain.
The municipality electricity cables reach as far as the gate to the property; Oren and Alex extended them a further 30m for their house. We needed to lay another 30m of cable to connect our house to the grid.
There is no municipality water where we are so we are having to find our own way of getting water.
El Nica, bending rebar
His name's Jhonny but I think they call him El Nica. I'm not sure why. Sometimes it's best not to ask too many questions.
Nica is short for Nicaraguan and I don't even know if he was born in Nicaragua or not. There is a significant amount of Costa Rican style pacifist racism against Nicaraguans so Jhonny's nickname could be a bit like a guy from England who was a bit tight with his money getting called "The Scot". Or maybe Jhonny really is Scottish. The possibilities are endless.
23 Mar 2011
Mold to poor concrete column
This mold or form (formaleta in Spanish) is where concrete will be poored around the steel reinforcement to form a strong concrete column at what I hope are strategic places around the house walls.
22 Mar 2011
Block Over Rebar Safety + Insurance
Jhonny, a.k.a. El Nica, slotting a block over a piece of steel rebar without wearing a helmet. Looks like a bit of a safety hazard. I asked him if he wanted one and he wasn't sure. I think at bigger construction sites more likely to be visited by Costa Rica's national insurance institute (INS) workers probably wear helmets.
Whatever you think about helmets, his skill at laying this block is still cool!
Tying rebar around walls
Here's Edgar tying two pieces of steel rebar together with a piece of wire. This horizontal steel reinforcement is laid on top of a row of blocks at every 60cm up the wall. All these kinds of details slow down work a bit but hopefully mean the house will be a lot stronger.
I don't know much or anything about earthquake resistance but I think the idea is that if the house moves, the whole house moves together and you don't end up with one wall moving one direction and another wall staying put and a big whole in the middle.
Laying blocks
It took me about 5 minutes to lay this block. Don Gerardo can do about 100 and an hour I think, if they're all in a row and there's nothing tricky. Apparently on some projects workers get paid per block but this is unusual probably done to save money. On our project they are paid per hour, probably minimum wage (about $2/hour) for the least skilled jobs and hopefully more than that for Gerardo who is managing things when the constructor is not around.
The tricky thing about the block is that it needs to be level back to front as well as left to right, and not just level but the right level - not too high or low - the same height as the others on the row. The guys working on our house really seemed to care that each block they laid was in the right position. It's easy to imagine some workers not caring too much and people ending up with wonky houses.
20 Mar 2011
Finished house design in 3D
We hope the finished house will look something like this 3-D drawing shows.
We worked with an architect who also happened to be the son of the guy in charge of the construction. In the end it was a difficult working relationship we had with him but the fact he was the builder's son made communication between them and the process of transferring plans much easier.
Day 13 - 50% of a wall
After almost two weeks there is a wall around the whole perimeter; this is the view of the back door towards Alex and Oren's house.
It was pretty hectic getting to this stage. When the constructor received the plans from the architect (his son) they weren't properly finished - it was important for us to start building as early in February as possible to make the most of the dry season and this meant that we didn't spend as long putting the finishing touches to the design as I would have liked.
In the end I don't think it was a problem - Caro and I were able to talk to William a lot and tell him what we wanted - the exact location of windows and doors, the height of windows and the location of the house on the plot of land were all decisions that we had to make in the first couple of weeks that should have been made before really. But I think things are turning out ok...
Of course it's been really important that we speak Spanish during this time. If we didn't then it would have been much more necessary to make sure the plans were as perfect as possible before putting any spades in the ground.
Edgar cutting rebar
Foundations have been laid but there is still loads of steel rebar to be cut - it is threaded throughout the house walls. Cutting, bending and threading must take a long time all in all but Edgar's still smiling I think.
Edgar lives pretty close to where the building site is, which is lucky for him. I don't think he had worked with the constructor, William, before but seemed to fit in with the team well. Finding construction workers in Costa Rica (and probably everywhere else in the world too?) seems to be a tricky business from the stories I hear. Seems William knows what he's doing when he hires people.
19 Mar 2011
Walls going up fast
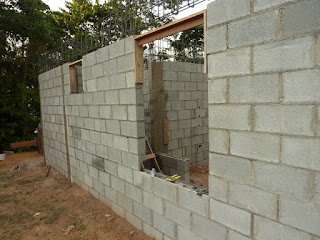
Here I'm trying to watch and learn how to lay a brick from master builder Don Gerardo. The string shows him when the block is level. But he's too fast for me to figure out what he's doing. And the house already has almost half a wall around most sides.
All the wood everywhere is just there to support the strings used to guide building. I think it is the kind of professionalism that impresses people who see our constructor working.
Building site with gravel, sand + cement mixer
The gap where Don Gerardo is stood (blue shirt) is the back door from the kitchen. To the right is the sand and gravel (or is this what they call hardcore?) brought on the first day. They both go into the cement mixer to make the cement. I will find out more about how this works... sometimes the cement they mix is very liquid for pooring and other times it is thicker for laying the blocks.
The big barrels by the cement mixer are full of water so that the team always have water to mix the cement - it is important not to run out because that would delay the construction process. The risk of water shortage in Costa Rica in the dry season is not high but can happen, even with the public water supply. Our supply is from a river on the property and since river levels drop in the summer we know there is risk that the amount of water we have will be limited. It's a long story.
18 Mar 2011
Day 10 - 20% of a wall
Mid way through week two and we have part of a wall on one side of the house. You can kind of see how the foundations, steel rebar and walls are all connected together. There is also a piece of rebar in between one layer of block and the next at the bottom of the picture.
Day 9 - Rebar and cement in trenches
Just over a week in and all the foundation trenches have been dug, the steel reinforcement has been lain and it has been covered with a liquid concrete / cement mixture.
Small slabs of cement for rebar
These small rectangular shaped cement blocks are at the bottom of the trenches. The idea is that the reinforcing steel bar will sit on them with a gap underneath between ground and the steel.
17 Mar 2011
1m deep foundation trench
This one meter deep trench is about 40cm deeper than an average trench due to the softer than average ground.
Making steel rebar
Construction began in february with four guys working on site plus the man in charge, who we referred to as "the constructor" ("el constructor" in Spanish). One of the first things he did was to buy all the steel reinforcement bar he thought he would need for the project to protect himself from changing steel prices.
Nice square corners for our house.
A close up of the preparations for digging the foundation trenches. Tools you will need: is that a "square" for checking right angles? And some kind of weird looking hammer for fixing the posts in the ground I'm guessing. The reason I have to guess is that we are renting a house 25 minutes from the building site so we don't get to see what happens every day.
I'm not sure whether the string marks the middle, inside or outside edge of the trenches to be dug. In the photo you're looking at the front left corner of the house. This is where the stairs are located.
Concrete Blocks: 12 x 20 x 40 cm
These blocks, which measure approx. 12cm x 20cm x 40cm, are used in the foundations of the house and for building the walls. Some have a rectangular hole in the middle to make them easier to split in half with a hammer. The climate where we are means that there is no need for a wall cavity to insulate the house - temperatures rarely fall below 10 degrees centigrade or 50 fahrenheit, even at night.
This means the walls will be the thickness of these blocks (12cm) plus a little extra for the plaster / cement coating.
In the background of the photo you can see the wooden structure put together to mark out the location of the trenches to be dug.
The ground needed no cleaning or levelling before they started these layout preparations. I was expecting them to check it was completely level but it seems it was already level enough.
Subscribe to:
Posts (Atom)